Tuesday, October 30, 2012

Happy Haunting

I hope it's already starting off as a Happy Halloween to all.  I wanted to share with everyone our Halloween traditions and fun festivities. 

First of all, Halloweeeeen starts with our family in the Spring.  I decide our costume and begin designing our "family" costumes.  Yes, everyone participates including the dog...hehe  Then, when there is any sign of Fall I begin creating our fine costumes.  I start early so it's done and I don't have to spend too much money last minute.  I'm happy to announce I only spent $40-$50 total on all four costumes.  I think that's a pretty good deal. 
I did have help with the Boo costume.  A friend of mine heard what we were dressing as and gave me her daughter's old "Boo" costume which I altered and customized for Bella.  I had a great starting off point though for that.  I paper mached my costume, "Mike Wisowski" and barely spent a dime on that outfit.  As far as "Sully", I think that was where the money came in for the fur.  I couldn't find any cheap fur so I bought white (half off sale I might add) and spray painted it to match the colors perfectly.  Homer's costume, "door" was just a recycled cardboard box.  I used paint I already had and was able to save money as well.  Bella even won a costume contest at one of the events we were able to visit. 


Every year, we have a fun family theme and Bella has sooo much fun with it.  She has been telling folks for months what we were going to be for Halloween. 

LIke I said before, Halloween starts early for us.  We begin decorating the first day of October.  I make the house look really spooky, not really spooky but fun to watch for us and the neighbors. 

These ghosts are so simple to make.  Just a doll rod, circle foam ball and white sheet.  I think they are easy to store, easy to put up and look so cute and classic.  We reseeded our lawn too in September so it helped keep the dog and kiddo off the grass:)  Two birds, one stone..I love it

We also love crafts and making crafts was an easy way to keep our excitment at bay while we still were weeks away from the big Night. 
I chose a theme each week and made crafts accordingly.  For example:  Bat, witch, pumpkins, ghosts and spiders.  Some were doubled up or stretched out.  It just depends on how many ideas I had for each theme.  The pumpkins were easy to stretch but there is only so much you can do with Witches! 


                                                                  BATS

This bat was cheap to make:) Actually, both my bats are cheap and recycled.  The one was just made with toilet paper roll or paper towel cut in half and black construction paper.  We added googly eyes and fun shiny paint because that's what we have lying around.  Feel free to get creative and use whatever you have too.  


This bat was made from an old egg carton.  I like to buy the natural eggs and they come in that recycled material-like carton.  WE just added some fresh black paint and those awesome googly eyes.  THey are hanging from our chandalier.  WE made a bunch too because they are essentially free.  By the way, I buy my paint from the dollar store.  It's only a dollar and goes a long way. 


                                                                  WITCHES


These witch hats were made with party hats and a paper plate.  Again, we used supplies we had around the house. 


 Bella doesn't have any concept of time or days of the week.  Sooo, what a mistake I made when I talked up Halloween and how excited I was for the big night.  Bella needed something to show her when it was.  Sooo, we made this witch countdown to Halloween.  Every day she looked forward to pulling off a ring from her countdown. 
This was made with a painted paper plate and scrap paper.  I love using supplies I already have and saving money. 


PUMPKINS


Gotta save those seeds and bake them. 


What's better than the pumpkin patch during Fall?  The pumpkin theme was probably the easiest.  We take our pumpkin carving seriously too...haha

Yes, that's a Jack-O-Lantern Pizza:) 


GHOSTS
Again, recycled items.  These are just milk jugs cut and colored with a Sharpie. 

This is a cool craft.  If you mix shaving cream and glue it forms a soft, puffy picture which is perfect for ghosts.  Bella loves when we use her body parts for painting too. 


Yummy marshmallows:)  This was a fun snack and craft...ha


Ghosts are so simple and easy.  A white construction poster board cut into a spiral pattern makes a ghoulish ghost.  We hung ours over the stairs and it spins every time we walk in the door. 

SPIDERS
This was probably my favorite.  We just painted Belle's hand and stamped it twice over the web.  Add those famous googly eyes and whala....SPIDER!

Don't forget all the popular traditions Halloween movies, books, and yummy treats:


Some get eaten before finished but they still turned out adorable!!! 

I also like to raid the dollar store (weird?)  for holiday crafts on the cheap.  Here are some foam cutouts we found and two ways to make the craft a fun activity. 

Did you know that when foam is wet it sticks to the tub?  I know, so simple and CHEAP.  We used this fun bathtime toy until Halloween.  They even stick to her.  haha

Bella had fun coloring these foam pieces.  I was looking for a fun way to display them and decided hanging them across a large area was best to properly show off her hard work. 

I hope it's not too late for you to start some fun, holiday traditions.  Even if I just spark one family fun activity, I will be content. 
As always, share your fun experiences!!!!

Monday, September 17, 2012

Homemade Books

So, one of my many OBSESSIONS is Children's Books.  I collect them and rarely buy something as often as I do, Children Books.  I have passed on my love for books to my perfect daughter, Bella.  She loves reading.  Our day revolves around books and fun themes that coordinate with books we are reading. 

One of my favorite authors (there are so many that I can't pick just one) is, Dr. Seuss.  Of course, I love Dr. Seuss right?  Anyway, one of my favorite books that is from my Dr. Seuss Collection is The Foot Book.  I still read Bella the same book I read over and over as a child.  It even has my name and phone number in it (just in case someone found it and wanted to return it to me...hehe). 

We were studying the letter "O" (I can't wait to finish all the letters and blog about our mini-lessons we have been doing with each letter, stay tuned for that) and I ran out of books that began with the letter "O" so I started reading books that had a lot of "O"s in them.  When we got to The Foot Book, I felt like it would be super fun to make our own book as a family.  Bella LOVED it and actually the whole family got in on the fun. 

Please look over our book and try to make one with your family too.  It really was easy and SOOOO much fun. 


First, it's important to map out how your book is going to read.  Then, time to start the fun :) 
I thought it was easiest to do all the footprints and then organize the book in order while they dry.  Adding details and making it pretty was my favorite part.  Well, actually it was all really fun. 


She kept saying it tickled. 


Everyone had to do it....EVEN HOMER our Bassett Hound


Bella brought him over for us.  However, it was a family job to do the footprint. 


Don't worry, he got a treat after the ordeal for such good behavior. 


After the prints were completed and I began organizing the pages, Bella did her magic on the cover.  Our cover was made with a paper bag that I cut to size. 


Here is our Final Copy!


There are several ways to make a simple book like this.  I just punched two holes in the left side and tied a black ribbon to hold everything together.  I had all the supplies to make this at home but if you are looking, I know it can be found at the Dollar Store for a grand total of under $5. 

Please, let me know what you think and post pictures from your fun.  I can't wait to make more books and keep them for Bella to look through for years and endless memories!!!!

Tuesday, September 4, 2012

Compost Craze

I know what you're thinking, compost is gross and stinky.  However, I have two options that are easy and stink proof. 

Option #1:  Holey Trash Can

First, just go to the store and buy a trash can (costs less than $10) and drill holes all over it.  Then, all you have to do is toss your yard scraps, kitchen scraps and shredded newspaper.  Every once in a while I make sure it's damp and decomposing well.  This was my latest photo taken of the process. 


Imagine what will happen to all those leaves in the fall.  I can just shove them in here and let them work for me all winter until my Springtime Garden is ready.  This is nice because it's outside, no smells and can hold a lot of stuff:) 

Option #2:  Worm Factory


For my birthday my sweet husband got a very romantic Worm Composter.  I was sooo happy.  This may sound terrible but it really is an easy and interesting process.  There are several bins in which are either "working bins" or "ready bins" to go in the garden that is. 
This picture was taken in my basement so it is clear that there is no odor either.  I did have it in the garage but it got too hot this year and the worms weren't happy.  I know it sounds silly but once you get to know your worms, it is obvious when they are thriving or struggling.  I really like having the worms because it is much quicker and super easy to just put your kitchen scraps in the bin once a week or so.  An established Worm Composter will use approximately 1 pound of food scraps a day.  The clever thing about this is it uses scraps and newspaper or even dryer lint.  Isn't that crazy?  I have the bin sitting down by my laundry and cna just toss the dryer lint in there too:)  A good mixture is about 50% scraps and 50% fiber (newspaper, dryer lint, egg cartoons, coffee filters/tea bags, etc.).  Once the worms are established it will only take a couple months for a full bin of amazing compost. 

This is my gorgeous bin ready for the garden.  I just have to find a spot that is worthy of this perfect soil. 


The worms are smart and as soon as the soil is drained of all it's nutrients they move up to the next bin.  Here is a picture of my "working bin."


Just under that newspaper is a ton of worms working hard for me:) 

I understand that this is a bit harder to try and it's not for everyone.  hehe  I love bugs and worms and dirt and not everyone is into this kind of stuff.  If you are a little interested just try the trash can first and go from there!!!!  I love how I'm recycling and reusing the things that would jsut be tossed aside!!!! 

Saturday, July 28, 2012

Olympics Party

My husband and I love the Olympics.  We love competition, rooting for our amazing country and of course getting together with friends and family to watch the games with a nice cold beer:) 
I was thrilled when my cousin, Dana asked me to help her with her Summer Olympic Opening Ceremony Party.  We had lots of great food and fun activities for the kiddos too. 

Let's start with the FIXINGS:

The cupcakes were fun to make and created a great background for the party.  I really like to incorporate decorations in with either food or fun.  This way there are double purposes for everything and you don't feel like anything is wasted. 
 Those cute little torches in the background are ice cream cones filled with Cheese Puffs (Bella's favorite snack).  The Licorice is a nice addition to the torch theme. 


The food table was fun because it had food from around the world.  There is a sub sandwich with various country flags, Chinese, Crab Rangoon and Egg Roll and the Brisket that came to the table after this shot. 


The beautiful buckets of British beer in honor of the Summer Olympics being held in LONDON!

It was fun for guests to dress up in support of their favorite country or event.  Check out some of the interesting outfits that showed up to party. 


Solomon along with his sweet baby brother, Joseph are both from Ethiopia.  Solomon wore his country flag with pride and had the name of a talented runner (I'm sorry I don't remember his name) on the front of his shirt.  He looked so cute:)  

The adorable Swim Team Family!!!

Aunt Claire supporting China!

My family just wore American shirts and colors.  We wanted to be comfy:) 


The kids had fun too!  They enjoyed these crafts which were common symbols of the Olympics.  So, I got a little mini-lesson in and they didn't even notice.  hehe


These were their very own version of the Olympic torches.  It's really simple and cheap to make.  I had several old wrapping paper rolls (they liked how big they were but you could also use paper towel), tissue paper (we used red, white and yellow) and small paper plates.  Begin by cutting an "x" in the center of the paper plate.  Then, feed the tissue paper through the paper plate.  Now glue the part of the tissue paper that you are going to stuff down the roll and YOU'RE DONE.


These were easy and fun too.  They each made their own Gold Medal.  I cut circles into yellow foam for each kiddo.  Then, they got to choose which star stickers (also foam) they wanted to decorate their medal with.  I wrote their name on them and hung each around their neck with a nice long piece of yarn.  They loved them and it was so simple for them to pretty much do by themselves.  


Solomon helped me make some paper chains which resembled the Olympic rings for decoration around the party zone. 

We had a great time and even learned a few things while we celebrated with the world.  Thanks for stopping by and as always, feel free to leave comments!!!!!

Tuesday, July 24, 2012

Big Girl Room

My daughter, Bella is TWO and was in need of a big step.  She was climbing out of her crib and we were worried she was going to get hurt. 
We already had a full size bed in our spare room so instead of investing in another "toddler bed" we decided to utilize the things we had.  Bella is so excited to have her mature room and I couldn't wait to show it off. 


When I was pregnant with Bella, we didn't find out what we were having.  I began her nursery with a simple theme using white furniture.  I found the dresser down the street from our home.  My neighbor had set it out for FREE and I snatched it up.  I gave it a fresh coat of white paint and threw on some new hardware, GOOD AS NEW! 
The beautiful dressing table was found at a Flea Market.  My dear friend, Nana Dare, found it for Bella and brought it home just in time for Bella's big girl room.  I also painted it white and put a pretty pink drawer pull which matches her other furniture.  The mirror was a great steal I found at Goodwill and painted white as well.  My husband hung it on the wall right above her perfect dressing table. 
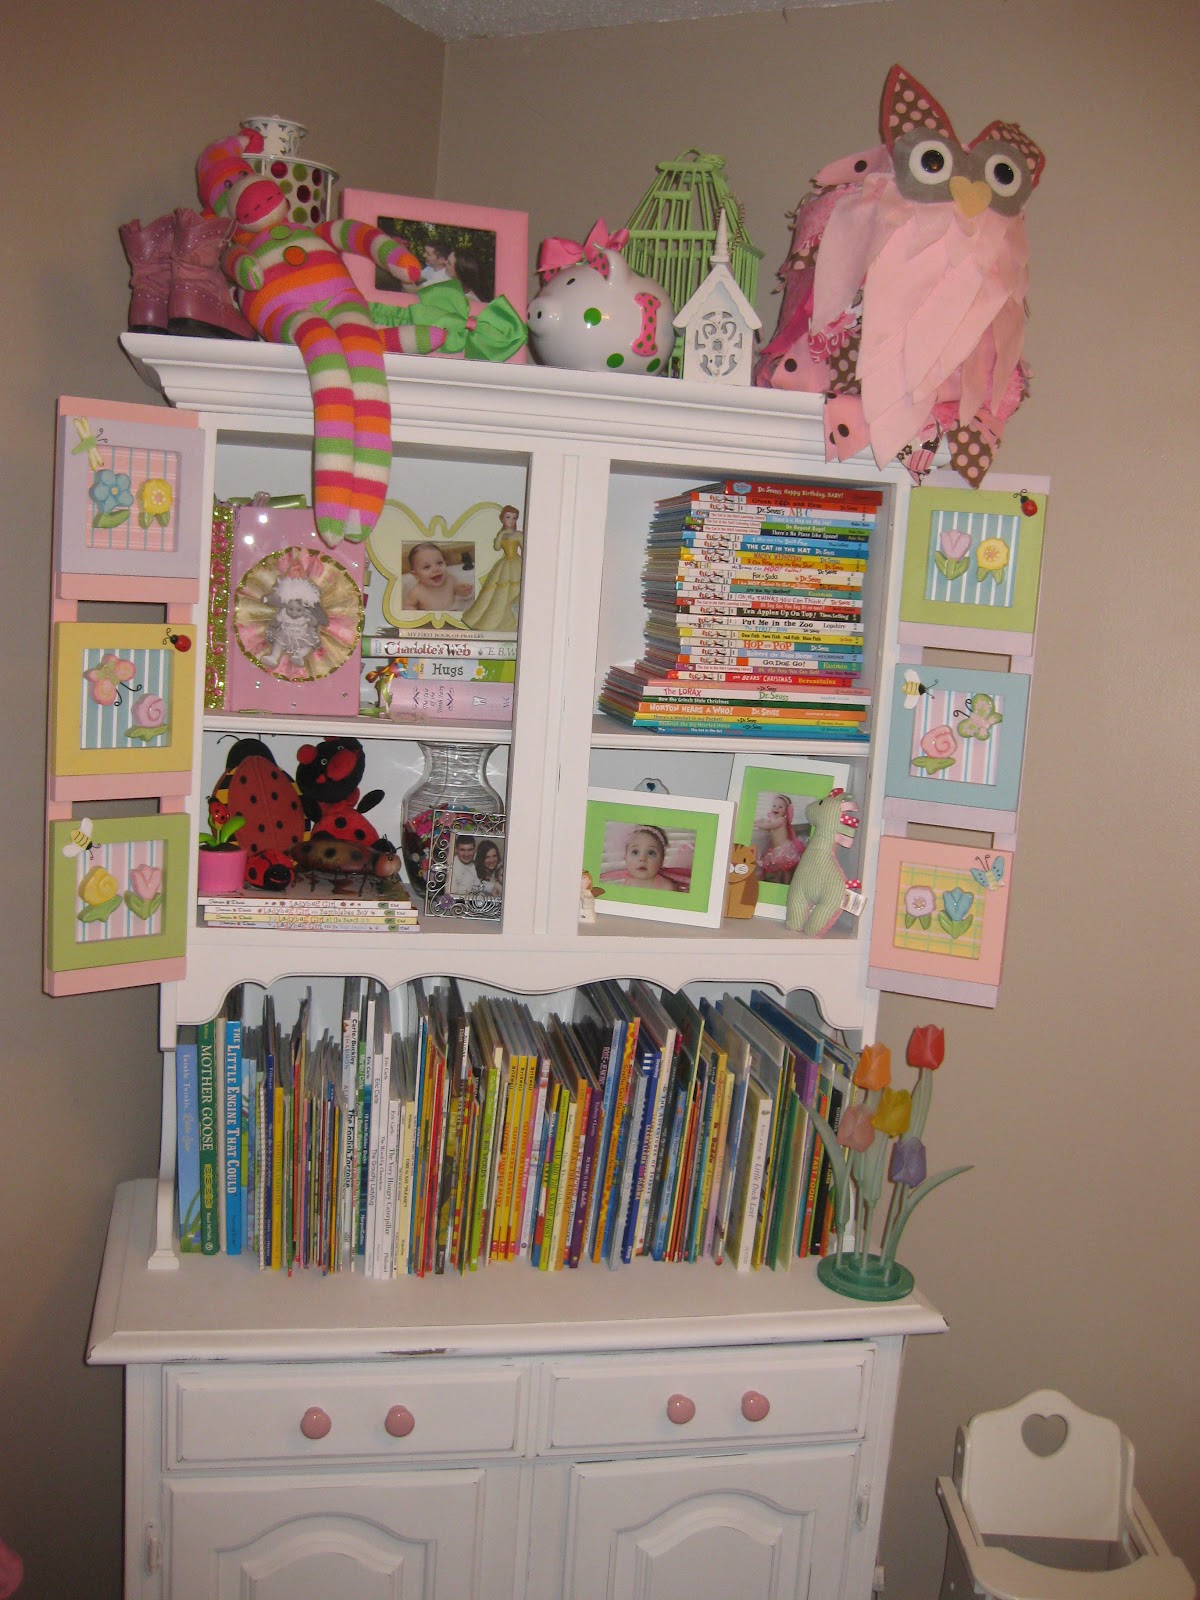
Please check out that amazing China Hutch in the corner.  I found that on Craigslist and of course painted it white.  Do you notice the pink knobs?  Oh, don't miss the shutters on each side of the hutch.  Those were actually a great find from my Step-Mom, Terri.  She brought those home from Goodwill and thought they would match Bella's room perfectly. I put some hinges on them and made some make-shift shutters. This was in my dining room until I upgraded to a larger hutch.  It really fits well into her room and can hold all her books. 


The final piece of furniture I wanted to talk about is her nightstand.  I actually was gifted that from a close friend's Momma.  Thank you Cathy.  The rest of the gorgeous bedroom set is in my room but this just wouldn't fit.  So, what did I do first?  Paint it WHITE!!!!  Then, put those pink knobs on there too. 
I love taking older furniture and bringing it back to life with some fresh paint and new hardware.  I get so many compliments and rarely spend very much money. 


I love the pretty coat hangers and they too have a fun story.  The sign on top which says, Isabella was a gift from one of my friends, Donna.  I feel like she has Bella on her mind all the time because she either calls me or comes home (my neighbor) with things that are perfect for Bella.  I believe she found it at TJMaxx.  The sign below it was black and I spray painted it hot pink which matches the room.  I love the simple room theme with a splash of color here and there.  It's nice to have all her hats, jackets, hair accessories, etc, hanging up and organized. 


Probably my favorite part of her room is the sweet pompoms and birdcage hanging above her bed.  If you are interested in making the tissue poms, check out this website:  http://www.thoughtfullysimple.com/how-to-make-tissue-paper-pom-poms/.  I found the tutorial on Pinterest and feel like she does a great job walking you through the steps.  The white pom made of tulle is super easy.  Just cut a bunch of strips the same length and tie a cute ribbon around it forcing it to puff out like a ball.  The flower balls are easy too.  I just raided the dollar store and bought a few wiffle balls, ton of silk flowers and matching ribbon.  You simply hot glue the flowers into the wiffle ball holes.  Leave one hole empty on top and feed a ribbon to hang from the ceiling.  The birdcage was a garage sale purhcase that I painted hot pink (just like the coat hanger).  Sometimes I throw stuffed animals in there or even butterflies Bella and I crafted together. 


As you can see, I made the ribbons several different lengths and various ribbon styles.  It's really fun to mix it up with unique colors, patterns and sizes. 

I hope you can take some ideas away and use them in one of your rooms.  Everything is very cheap and easy to make.  I am a crafty person but I don't have time to do anything too involved.  You can do ANYTHING and EVERYTHING I did in Bella's room. 

As always, please leave your comments, advice, and questions!

Monday, July 2, 2012

Floatation from the future!

Good Morning Moms,
I have found an amazing new floatation device and it is fabulous.  This new life jacket is called, The Puddle Jumper.  We found ours at Walmart for less than $20.00.  I have seen it in most stores that carry swim gear. 


This type of life jacket helps keep the kiddos upright in the water or if anything puts them more on their back.  Bella loves it and feels like she's still independent.  I feel like a regular life jacket throws them forward and face down.  Check out how well she's swimming all by herself at the age of 2. 


I know this post is short but it's quick and simple.  Let me know how you like it!!!! 

By the way, Bella doesn't even want to take hers off.  She's been known to take a nap in her pretty, purple, Puddle Jumper. 

Monday, June 18, 2012

White Castle Fake Out Burgers

These burgers are sooo easy and cheap to make.  I tried these on New Year's from a friend, Corey.  She told me what was in them and I couldn't believe, there are no onions.  Can you believe that? 
As a Mom, I am constantly stuck between cooking delicious meals for my family and finding the time to do so.  Check out this simple recipe. 

Belly Bombers:

1 lb. Ground meat
1/2 Block Velveeta Cheese
1 package Onion Soup
1 can Cream of Mushroom or Cream of Chicken
2 packs Hawaiian Delight Buns (this picture has the large kind but the smaller ones are more like White Castle) 

Brown meat and mix in Onion Soup.  Cut cheese into cubes and melt in with can of soup.  Spoon onto buns and reheat if needed at 350 - 15 minutes.  Be careful that sweet bread browns easily.  Good luck:)  These are very yummy and it freezes well too. 

Let me know if you make it and how your family liked it!!!